Adding Yo-kai (YW2)
Written by @n123original on Discord. This guide assumes you already know how to navigate romfs and use CfgBin Editor. If not, please read the starting guide.
- First, extract
chara_base*.cfg.bin,chara_scale*.cfg.bin, andchara_param*.cfg.binfromdata/res/character.- The
*refers to versioning, so instead of justchara_base.cfg.binyou might also see files such aschara_base_0.04c.cfg.bin. Pick the one with the highest version.
- The
Model Handling
This method is out of date, from a very very old guide - I don’t use studio eleven so I won’t update this section for now.
- First, export the base Yo-kai model folder using Kuriimu2.
- Next, import the extracted folder into Metanoia and export it as an
.obj.- Next, edit the model in Blender.
- Finally, export the model as a
.xc.
- Note: On the export menu, go to Template and select MESH (PRM), then export using the YW2 Template.
- First, change all IDs in your exported model files to an unused ID (e.g., change
y152000toy152100). - Next, open
yw2_a.fain Kuriimu2, navigate todata/character, and import your new folder.- If doing a texture swap, edit the image inside the folder.
- If using a new model, replace the
p00file.
Modifying CharaBase
- First, open
chara_base*.cfg.binin CfgBin Editor. - Next, duplicate a
CHARA_BASE_YOKAI_INFO_*entry, the new entry should appear at the end of the tree. - Next, configure the parameters:
BaseID: A template isn’t strictly needed, but to mimic Level-5, this should be the CRC-32 of the model name (e.g.,y101000).FileNamePrefix: Determines the first letter of the model name (0=c,1=d,2=i,3=m,4=r,5=x,6=y,7=z). While any will work, Level-5’s convention is6(y) for Yo-kai and5(x) for Bosses.FileNameNumber: The middle part of the model name, which must be exactly 3 digits long (for example, use108for 108, or005for 5).FileNameVariant: The third part of the model name, which must be exactly 2 digits long (for example, use60for 60, or02for 2).- These parts combine with the prefix and a trailing zero to form the full model name. For example, a prefix of
6(y), a number of108, and a variant of60becomesy108600.
- These parts combine with the prefix and a trailing zero to form the full model name. For example, a prefix of
NameID/DescriptionID: The TextIDs for the Yo-kai’s name and medallium description. To add these, extract and openchara_text_<LG>.cfg.binfromdata/res/textinsideyw2_lg_<LG>.fain CfgBin Editor.- For
NameID: Duplicate aNOUN_INFO_*entry, regenerate theNounTextID(no template needed), change theTextString, increment (increase by 1) theChildCountof theNOUN_INFOtree, and update theNameIDin yourCHARA_BASE_YOKAI_INFO_*entry. - For
DescriptionID: Duplicate aTEXT_INFO_*entry, regenerate theTextID(no template needed), change theTextString, increment (increase by 1) theChildCountof theTEXT_INFOtree, and update theDescriptionIDin yourCHARA_BASE_YOKAI_INFO_*entry.
- For
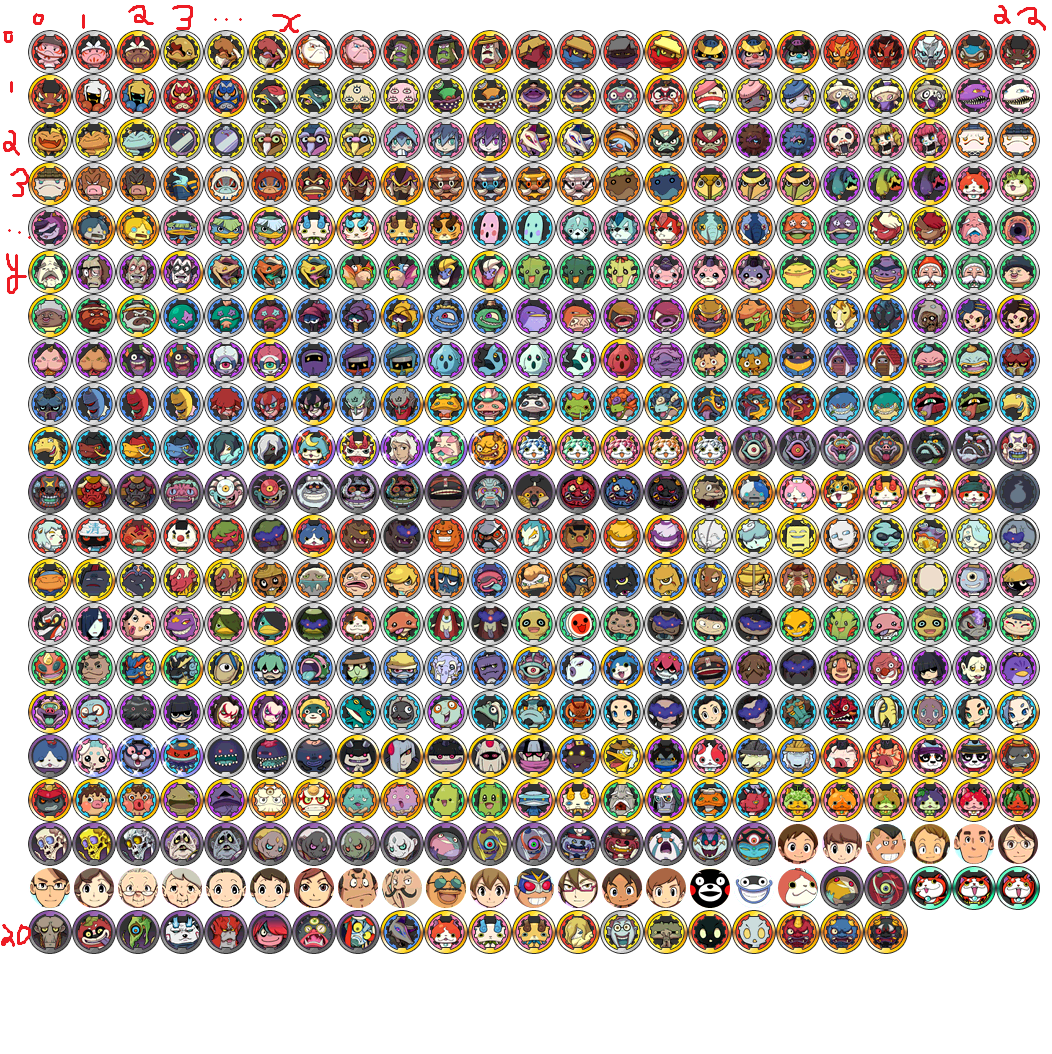
MedalPosX/MedalPosY: Determines the position on the medal spritesheet atdata/menu/face_icon/face_icon.xi.MedalPosXis the X coordinate (starting from0for the first medal, increasing to the right).MedalPosYis the Y coordinate (starting from0, increasing downwards, meaning0, 0is the top-left). Here is a reference image:
- Also note that are also larger per-Yo-kai images (not medals) at
data/menu/face_icon/yXXXXXX.xi. Copy one and edit it using Kuriimu2 to your liking. - There are also medal files at
data/menu/dx_medal/yXXXXXX.xr. Copy one from a Yo-kai with the same tribe and edit it with Kuriimu2 to your liking.
- Also note that are also larger per-Yo-kai images (not medals) at
Rank:0(E) to5(S).Tribe:0(N/A),1(Brave),2(Mysterious),3(Tough),4(Charming),5(Heartful),6(Shady),7(Eerie),8(Slippery),9(Wicked),10(Boss).IsRare,IsLegendary,IsClassic: set to0if false, else1if true.FavoriteFoodItemType/HatedFoodItemType: Determines the food preference. Common values:1(Rice Balls),2(Bread),3(Candy),4(Milk),5(Juice),6(Burgers),7(Ramen),8(Sushi),9(Chinese Food),11(Vegetables),12(Meat),13(Fish),14(Curry),15(Sweets),16(Oden),17(Soba Noodles),18(Snacks),19(Chocobars). Other Type(s) exist for non-food items like equipment, key items, or talismans.LegalAlliances: Determines which “Alliance” your Yo-kai can originate from. Meaning1= BS only,2= FS only,3= Wicked,7= BS/FS (Most Yo-kai!).WorldMapPosID: Determines the location it’ll state it was befriended from in the Medallium.MedalliumOffset: The position in the Medallium.
[!CAUTION] The
MedalliumOffsetmust be a unique value, less than 512 to prevent crashes. In an unmodified copy of Yo-kai Watch 2: Psychic Specters, unique values start from 449 onwards.
Modifying CharaScale
- First, open
chara_scale*.cfg.binin CfgBin Editor. - Next, duplicate a
CHARA_SCALE_INFO_*entry from a Yo-kai with similar proportions, the new entry should appear at the end of the tree. - Next, change the
BaseIDto theBaseIDof your own Yo-kai. - Next, adjust the scaling parameters if needed.
- Finally, increment (increase by 1) the
ChildCountof theCHARA_SCALE_INFOtree that contains the entries.
Modifying CharaParam
- First, open
chara_param*.cfg.binin CfgBin Editor. - Next, duplicate a
CHARA_PARAM_INFO_*entry, the new entry should appear at the end of the tree. - Next, configure the parameters:
ParamID: Like BaseID, to mimic Level-5 this should be the CRC-32 ofpara_<MDL>(e.g.,para_y101000).BaseID: Use the ID generated in the previous step.- Stats: Set
BaseAandBaseBvalues for HP, Strength, Defense, Spirit, and Speed. Note that for Bosses,BaseBstats are ignored. ExperienceCurve: A number from 0 to 6. The higher the number, the more EXP is required to level up the Yo-kai. To keep this guide as short as possible, formulas will not be included here.CharaRandomActType: Holds a Type which an entry in theCHARA_RANDOM_ACT_INFO_*tree defines. You can inspect these entries to create your own attitude combinations and probabilities via duplicating aCHARA_RANDOM_ACT_INFO_*entry. The available attitudes are:0= None/Empty (used for Yo-kai such as Wicked Yo-kai),1= Grouchy,2= Logical,3= Careful,4= Gentle,5= Twisted,6= Helpful,7= Rough,8= Brainy,9= Calm,10= Tender,11= Cruel,12= Devoted.BaseLoafAttitude: Determines the base loaf attitude. The available options are:0= Serious,1= Stiff,2= Casual,3= Carefree,4= Sloppy,5= Clumsy.EquipmentSlots: Determines the amount of equipment slots a Yo-kai can have. This MUST be0,1, or2. Values of 3 or higher will not work in the UI, memory, or save files. Circumventing this requirescode.binor advanced XQ modifications, which will not be covered in this guide.BaseInspiritEvasion%: The base chance for this Yo-kai to dodge inspirits. This is0for most (but not all) bosses.FriendRateDescriptor: Determines the befriending rates for a Yo-kai. To keep this guide short, the specifics of this will not be covered here.BaseMoneyDrop/BaseExperienceDrop: The base rewards for defeating this Yo-kai, not accounting for wisps, souls, or other modifiers. For Bosses, level doesn’t affect these as they are internally level 0 and have special exceptions programmed into the formulas. To keep this guide as short as possible, formulas will not be included here.CommonDropItemID/RareDropItemID: TheItemIDfor the common and rare drops, respectively.CommonDropBase%/RareDropBase%: The percentage chance for the common and rare drops, respectively.- If you want only one item to drop, it is recommended to set it as both the common and rare drops, but set the rare drop version to a base probability of
0%. This makes sure gold wisps fairly account for drops, as Level-5 themselves do.
- If you want only one item to drop, it is recommended to set it as both the common and rare drops, but set the rare drop version to a base probability of
GeneralFoodQuoteTextID,FavoriteFoodQuoteTextID,HatedFoodQuoteTextID,LoafQuoteTextID: The TextIDs for the Yo-kai’s food and loaf quotes. To add these, extract and openbattle_text_<LG>.cfg.binfromdata/res/textinsideyw2_lg_<LG>.fain CfgBin Editor. For each, duplicate aTEXT_INFO_*entry, regenerate theTextID, change theTextString, increment (increase by 1) theChildCountof theTEXT_INFOtree, and update the corresponding ID in yourCHARA_PARAM_INFO_*entry.BefriendQuoteTextID: The TextID for the quote when befriending the Yo-kai. To add this, extract and openaddmembermenu_text_<LG>.cfg.binfromdata/res/text/menuinsideyw2_lg_<LG>.fain CfgBin Editor. Duplicate aTEXT_INFO_*entry, regenerate theTextID, change theTextString, increment (increase by 1) theChildCountof theTEXT_INFOtree, and update theBefriendQuoteTextIDin yourCHARA_PARAM_INFO_*entry.AttackBtlCommandID/BaseAttack%,TechniqueBtlCommandID/BaseTechnique%,InspiritBtlCommandID/BaseInspirit%,GuardBtlCommandID/BaseGuard%: TheBtlCommandIDfor the respective action, and its base probability of being used.SoultimateBtlCommandID: TheBtlCommandIDfor the Yo-kai’s Soultimate move. This does not have a base probability as it is manually controlled by the player.SkillID: TheSkillIDfor the Yo-kai’s Skill/Ability.FireAttributeMultiplier,IceAttributeMultiplier,EarthAttributeMultiplier,LightningAttributeMultiplier,WaterAttributeMultiplier,WindAttributeMultiplier: Determines the damage multiplier taken from these attributes. For game design reasons, it is recommended to follow Level-5’s pattern of setting most to1, one to1.5(weakness), and one to0.5(resistance).IsFusable: Set to0if your Yo-kai cannot be fused.- Creating fusions is a seperate guide. Please follow it once you have finished with this guide, if you want to register a fusion.
EvolveOffset: Set to-1if your Yo-kai cannot evolve.
- To make a Yo-kai evolve:
- First, duplicate a
CHARA_EVOLVE_INFO_*entry, the new entry should appear at the end of the tree. - Next, set the
Levelto the level you want the Yo-kai to evolve at. - Next, set the
ParamIDto theParamIDof the Yo-kai you want it to evolve into. - Finally, increment (increase by 1) the
ChildCountof theCHARA_EVOLVE_INFOtree that contains the entries. - Then, go back to your Yo-kai’s
CHARA_PARAM_INFO_*entry and set theEvolveOffsetto the offset of theCHARA_EVOLVE_INFO_*entry (e.g.,3to referenceCHARA_EVOLVE_INFO_3).
- First, duplicate a
Adding to Yo-kai Cam
- First, open
face_config*.cfg.binfromdata/res/facein CfgBin Editor. - Next, in the
FACE_YOKAItree, search through differentParamIDs until you find a Yo-kai with 2FACE_YOKAI_*entries. Replace theParamIDin one of them with your own Yo-kai’sParamID.- Note: Do NOT change the
PFIDKey(unless you know what you’re doing) nor add a new entry (ever!), it must have exactly 512 entries.
- Note: Do NOT change the
- Next, in the
FACE_YOKAI_OFStree, duplicate aFACE_YOKAI_OFS_*entry belonging to a Yo-kai with similar size and proportions, the new entry should appear at the end of the tree. - Next, change the
BaseIDto theBaseIDof your own Yo-kai. - Next, adjust the offsets if needed.
- Finally, increment (increase by 1) the
ChildCountof theFACE_YOKAI_OFStree that contains the entries.
Adding to Blasters
- First, open
orge_time_chara_param.cfg.binfromdata/res/orgein CfgBin Editor (note that this incorrect spelling of “orge” instead of “ogre” is intentional. Level-5 does not spell ogre right until later titles). - Next, duplicate an
ORGE_CHARA_PARAM_*entry from theORGE_CHARA_PARAM_LISTtree, the new entry should appear at the end of the tree. - Next, configure the parameters, for example:
BaseID: Change to theBaseIDof your own Yo-kai.BlastersRole: Set to your Yo-kai’s role (0= N/A,1= Fighter,2= Tank,3= Healer,4= Ranger).OrgeHPType: Holds a Type which anORGE_CHARA_LIFE_PARAM_*entry in theORGE_CHARA_LIFE_PARAM_LISTtree defines, similar toCharaRandomActType.OrgeSpeedType: Holds a Type which anORGE_CHARA_SPD_PARAM_*entry in theORGE_CHARA_SPD_PARAM_LISTtree defines, similar toCharaRandomActType.StrengthOrgeAttType: Holds a Type which anORGE_CHARA_PARA_PARAM_*entry in theORGE_CHARA_PARA_PARAM_LISTtree defines, similar toCharaRandomActType.SpiritOrgeAttType: Holds a Type which anORGE_CHARA_PARA_PARAM_*entry in theORGE_CHARA_PARA_PARAM_LISTtree defines, similar toCharaRandomActType.
- Finally, increment (increase by 1) the
ChildCountof theORGE_CHARA_PARAM_LISTtree that contains the entries.
Adding Capsule Dialogue
- First, extract and open
capsule_text_<LG>.cfg.binfromdata/res/textinsideyw2_lg_<LG>.fain CfgBin Editor.<LG>refers to the language region (e.g.,engbfor European English,frcafor NA French,frfor European French). - Next, duplicate a
TEXT_INFO_*entry, the new entry should appear at the end of the tree. - Next, recalculate the
TextIDusing the templatetext_cpsl_<MDL>(e.g.,text_cpsl_y101000). - Next, change the
TextStringto the dialogue you want to play when the Yo-kai is freed from the Crank-a-kai. - Finally, increment (increase by 1) the
ChildCountof theTEXT_INFOtree that contains the entries.
Adding Preset Nicknames
- First, in the same
yw2_lg_<LG>.fafile, extract and opennamemenu_text_<LG>.cfg.binfromdata/res/text/menuin CfgBin Editor. - Next, duplicate a
TEXT_INFO_*entry for each nickname you want to add, the new entries should appear at the end of the tree. - Next, recalculate the
TextIDusing the templateomakase_<MDL>_XX, whereXXis the nickname slot (00for the first,01for the second,02for the third, and03for the fourth). - Next, change the
TextStringto the desired nickname. - Finally, increment (increase by 1) the
ChildCountof theTEXT_INFOtree that contains the entries.