How to Add Items
Original guide by @stringsbutalt on discord. Rewritten, and expanded on by @n123original
CONFIRMED TO WORK ON YO-KAI WATCH 1 & 2.
Yo-kai Watch 1
Registering the Item Name & Description
- Open
data/res/text/item_text_<LG>.cfg.bin; where<LG>is the language you want to make the name for. For example:jafor Japanesefrfor Frenchenfor English (American/NA/US/AUS)engbfor English (British/EUR)itfor Italian, etc
-
Add 2 to the value of entry group
TEXT_INFO. -
Duplicate 2 entries.
-
In the duplicated entries generate a new CRC32. Set it as the
TextID. You should have 2 now. One for the Item Name and one for the Item Description. -
Now for your name entry set the “
Text” field to your items name. In description entry set the “Text” to your item’s description. - Remember (or note down) your
NounTextID& DescriptionTextID. you’ll need these for later.
Creating the Item Icon
-
Open
data/menu/item_icon.xiin K2 -
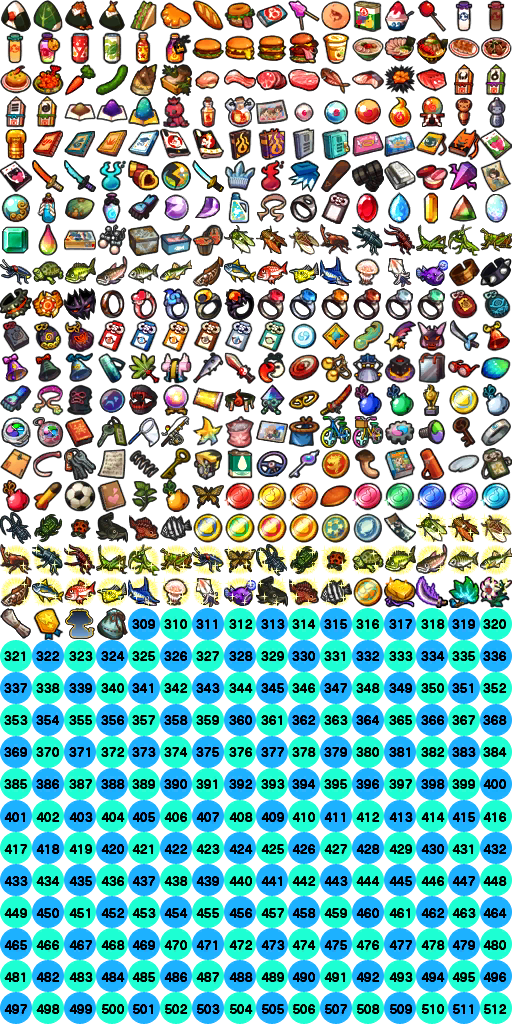
Open and extract the PNG. Edit the png to add a new item to the next slot in the spritesheet (yw1 image below for reference)
-
To start off, copy a different item icon i.e.
item_002.xi. - The number can be calculated with the formula
(16 * IconPosY) + IconPosX + 1padded to 3 digits i.e. 2 would beitem_icon_002.xinotitem_icon_2.xi.IconPosXis how far to the right it is initem_icon.xistarting at 0; so anIconPosXof 0 means the leftmost items,IconPosYis how far down it is so anIconPosXandIconPosYof 0,0 means top-left corner.
- Change the texture to your custom items texture
Registering the Item
-
Open
data/res/item/item_config_0.05d.cfg.binin CfgBinEditor - On the entry root entry of your Item’s category and increase the
ChildCountby 1.- If your making a consumable (Food and misc. Items) the entry group will be
ITEM_CONSUME, if your making Equipment it’ll beITEM_EQUIPMENT, Key Items are underITEM_IMPORTANTand Critters (Bugs/Fish/Insects) are underITEM_CREATURE.
- If your making a consumable (Food and misc. Items) the entry group will be
-
Open your root entry.
-
Duplicate one of the child entries.
-
Set your tags to
YW1 - Generate a ItemID from a CRC-32 website such as this
- Tyoe anything you’d like it should turn out as something like
0x50ED2AAD(this example website dosen’t show the0xbut add it anyway). Now add that as yourItemID
- Tyoe anything you’d like it should turn out as something like
-
Add The
NounTextIDwe made in the previous step. - Add The
InventorySort. this (and the item category i.e.ITEM_CONSUME) determine the category your item will be sorted in within the game’s UI.
Yo-kai Watch 1 InventorySort(s):
10: Food20: Misc Items30: Critters (Bugs & Fish)40: Equipment50: Key Items
- Add the ItemType:
Yo-kai Watch 1 ItemType(s):
0: Misc Items1: Rice Balls2: Bread3: Candy4: Milk5: Juice6: Burgers8: Ramen10: Chinese Food12: Vegetables13: Meat14: Fish (Food)20: Fish (Critters)21: Bugs/Insects30: Equipment40: Key Items41: Trophies50: Talismans51: Medicine52: Getaway Plush53: Staminums54: Exporb55: Move level Books56: Attitude Books57: Loaf Books70: Crank-a-kai Coins
- Set your Offsets.
- Set
ItemNumto the the number of the previous item + 1 - Set
GlobalItemIndexto the number of your item xi. So item_309.xi would be 309.
- Set
-
Set your
CarryCap(Maximum amount of items you can have in a stack. This is usually 99) -
Set your
SellPriceandDefaultBuyPrice. - Set
CanBeBought,CanBeSoldandIsFusable:0- No (False)1- Yes (True)
- Set the offsets for
ItemPosXandItemPosY.- It should be how far across is the item and how far down in
item_icon.xiNote: This is zero-indexed meaning an
IconPosYof0refers to the first row,1refers to the second row etc; same for columns akaIconPosX.
- It should be how far across is the item and how far down in
-
Set your
InvMenuTextIDandNounTextIDto theTextIDyou made for your item in the previous step. -
Open
ItemIndexand add 1 to the entry group value (ChildCountof the tree). - Duplicate a entry. Set the
ItemIDto theItemIDyou created. Set theInventorySortto yourInventorySort, and theMainItemIndexto the last entry’sMainItemIndex+ 1.
If it’s a consumable:
- Set
EffectAto the effect type andEffectAValueto it’s value. Same forEffectBif you need a 2nd effect. I.e. setEffectAtoInfinite Stamina (Seconds)andEffectAValueto 30:
Yo-kai Watch 1 Consumable Effect(s):
0- N/A (No Effect)1- Run BtlCommandID (Used for special effects such as feeding enemies for befriending)2- Heal HP3- Raise XP4- Raise Attack/Technique/Soultimate level by 1, 3 increases Soultimate Level, 2 increases Technique Level and 1 increases Attack Level.5- Edits a Yo-kais Move Attitude, NOT loaf attitude.6- Infinite Stamina (Seconds)7- Raise Attitude Points (used for EV developement; aka stat buffs)
If it’s an equipment:
- Set
STRBuffand the Buff’s for all the other stat’s to the stat changes you want i.e. 5 = +5, -5 = -5, 0 = unchanged. - Optionally, set
SkillIDA(andSkillIDBif you need two) to theSkillIDs for the special effect you want your equipment to have. Finally, if you don’t want your equipment to have any requirements setEquipRequirementto 0, otherwise follow the steps below:
Equipment Requirements
If the game has already registered a requirement you want to use for an item use one of the following, otherwise continue to create custom requirements:
Yo-kai Watch 1 Vanilla Equip Requirements:
0- N/A1- D-rank or lower Yo-kai2- Cicada Yo-kai (Cadin, Cadable and Singcada)3- Cat Yo-kai (Jibanyan, Thornyan, Baddinyan, Robonyan, Goldenyan, Dianyan, Sapphinyan, Emenyan, Rubinyan, Topanyan, Shogunyan)4- Kappa Yo-kai (Walkappa, Appak and Supyo)5- Tengu Yo-kai (Tengu and Flengu)6- Wiglin, Steppa and Rhyth7- Badude and Bruff If none of these suit your goals; it’s time to make some custom requirements!- Click on the top-level tree
ITEM_EQUIP_CONDand increaseChildCountby 1 - Then duplicate an
ITEM_EQUIP_CONDand setStartBoundaryandBoundaryLengthto 0. - If you want your equipment to have a Maximum Rank (i.e. only D-Rank Yo-kai or under), set the
MaximumRankto that rank:
YW1 Ranks:
0: E1: D2: C3: B4: A-
5: S - If you want other conditions in Yo-kai Watch 1 you’ll have to whitelist specific Yo-kai.
- To do this set
StartBoundaryto the amount ofITEM_EQUIP_COND_CHARA(s) for example if there’s 10 the last one will be calledITEM_EQUIP_COND_CHARA_9in CfgBin Editor. - Then set
BoundaryLengthto the amount of Yo-kai you want to whitelist. - Then duplicate an
ITEM_EQUIP_COND_CHARABoundaryLengthtimes (and increaseChildCountof the main/root entry byBoundaryLength) - Then for each
ITEM_EQUIP_COND_CHARAyou’ve duplicated, set theBaseIDto theBaseIDof a Yo-kai you want to whitelist.
- To do this set